Dragon Pit is located in Fafnir's Swamp, 9 up and 15 right from the Wen teleporter. It is divided into three sections which are really complete caves of their own: the Hatchery, the Library, and the Maze/Fafnir's Lair (not to be confused with the aboveground Maze area, just north of Forest of Death). Each section has one or more "named" or "boss" dragons at the end, that can drop the coveted Dragon Pit gear.
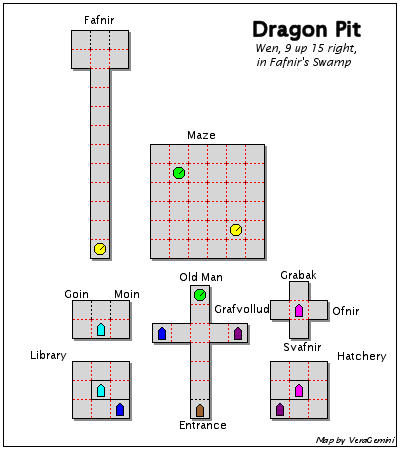
 Here's a map. (Click to download a larger version, or right-click and save for the compact version.) Note that the Maze section wraps around on itself, that is, going up from the top row takes you back to the bottom row, and going right from the far right row takes you back to the far left row. Also note that yes, there really is a fight on almost every screen. Four squares in you come to a crossroads. Going to the left takes you to the Library, the right takes you to the Hatchery, and straight up takes you to the Maze and then to Fafnir.
Most, if not all of your group should be 1k for DP, and any toon under 750 really has no business even trying. Some people do HoZ parts of the cave, but this is extremely chancy and requires a friend or an alt that isn't grouped following you around to pick up what you drop when you die. Since this is a guide to surviving Dragon Pit, I'm only going to cover group hunting, and the kind of group that can finish the entire cave. This is the makeup of the group I run DP with, that works very well. You don't have to follow it to the letter, but whatever toons you use should be similar. All toons should have RoDs or RoPs if possible, as well as any other DP gear that's available. If the warriors don't have a BPoB, then a PoI is advisable.
First: ASGW, wearing a Ranger/HoP/HoK, using a BC or an IC.
Second: AEGW, with a Ranger/Hop/HoK and also a Magical Helm like Marvin sells. Weapon should be a BC or IC and a Fafnir's Fang. (I'll explain the reason for the Marvin helm and the dagger shortly.)
Third: ASGW, wearing a Ranger/HoP/HoK, using a BC or an IC.
Fourth: ASGW, wearing a Ranger/HoP/HoK, using a BC or an IC, or an ASGT in a Ranger/HoP/HoK, with a Duach's Thorn. (The ASGT could also lead.)
Fifth: Elf warrior, wearing a Ranger/HoP/HoK, mythril plate (not a PoI), using a Wrath, Odin's Edge, or a Gram.
Sixth: AIEW, with a Mage Hat (preferable) or an HoS.
As many toons as possible should have EB, and it's an absolute requirement for the caster toons in fifth and sixth position.
The Library is the easiest section by far. It can be done with only 2 giant hitters and 1 wizzie to keep them invulled and healed. Moin and Goin are the end fights here, they are large blue Storm Dragons with health in the 90k to 110k range. They cast a pretty wicked Electric Fury, but they aren't grouped. Just tank them, stay invulled, and make sure no one's missing a Lightning Shield chant, and you'll be fine. The Library is known to drop Rings of Power and Rings of Destruction, Amulets of Adventure, and occasionally mage or warrior armor. It is also the only location known to currently drop the spells Mabon's Forced Flee and Despothes' Wrath, but these are extremely rare finds.
The Hatchery is considerably harder than the Library. There are four end fights here, each one a different kind of Dragon Brood Mother, with a group of Hatchlings. The easiest of the four is Svafnir, the Swamp Brood Mother. She's located 1 down once you enter the Hatchery proper. Before starting the fight, the toon in second should put on the Marvin helm and equip the Faf Fang. The helm causes you to take 50% less melee damage, but it also makes you miss 50% of the time, and has a heavy cast resist. So the toon wearing it won't be doing much damage, but that's fine, they are there to keep the heavy hitter dragons off the rest of the group. The Faf Fang is used because it has a 1 square range, and this pushes the dragon back, away from the rest of the group. So, cast defenselessness on Svafnir to start the fight, then first round everyone tries to freeze a hatchling. (The Brood Mothers themselves cannot be frozen.) Second round the AEGW in second starts in on Svafnir, while the rest of the group takes out the hatchlings one by one. Once Svafnir is pushed well away from the rest of the group the AEGW should switch back to his or her BC, and once the hatchlings are finished, then he or she should switch helms, too. Swamp dragons cast Poison Bolt, so an EB may or may not be needed at some point.
Next up, and next easiest is Ofnir and her swarm of Moor Hatchlings, on the right side of the Hatchery. The strategy here is exactly the same as for Svafnir. Moor dragons don't cast, but they hit harder than Swamps, and have natural immo as well as a poisoned bite.
Next is Grabak, the Bog Brood Mother, in the top room of the Hatchery. She can (and will) cast Acid Rain for up to 9k damage, so if your wizzie is using an Uruz, or anyone is wearing a HoD, now's the time to take it off. The strategy here is mostly the same, except you will be EBing often.
Grafvollud, to the left, is the most difficult of the dragon mamas because of the Earthquakes she and her kiddies cast. EQ is especially nasty because not only does it do massive damage, it can stun you for up to 3 rounds and fumble your weapon. The plan here is for 5 toons to attempt to freeze the hatchlings, while one of the giants (either 1st, 3rd, or 4th) EBs first round. Second round and beyond, the AEGW pushes Grafvollud back while the rest attack, but the wizzie should be EBing every round, and the second caster should be watching closely to take over EB duties for a round or two if the wizzie gets stunned. If both casters are stunned, then one of the giants needs to do it.
The Hatchery drops both mage and warrior armor. It does not drop any of the DP weapons, or the level 500 required items (like the Shield of Infinite Thought), those are Fafnir only drops.
The shortest route through the Maze to Fafnir's Lair is 3 up and 3 right from the lever that's marked green on the map. In the square with that lever is an NPC named Old Man. He sells scrolls, potions, and mana at prices that would make even Marvin blush, but he's a good place to repair your gear if you're doing more than one section. On the way to Fafnir, through the Maze are a couple of smallish dragon fights, 2 groups of NPC Thieves with insane hp and weilding Mist weapons, and a really annoying fight consisting of 12 Slimes and Sludges. Mass zerk both the Thieves and the goo, and don't let the latter box in any of your group.
Once you're past the lever marked yellow on the map and into the straight run up to Fafnir, it's all dragons. When you start seeing 3 or more large dragons on the screen the strategy is for your wizzie to freeze one, while everyone else tries to freeze one of the others - the same one. The worst potential hazard is about 3 screens away from the Lair, and it is 4 Legendary Mire Dragons. Treat them like you did Grafvollud and her brats, by EBing every round. There's no need for the AEGW to switch to the dagger and Magical Helm however, until Fafnir.
Fafnir is a Swamp dragon, with up to 190k health. He has 2 Dragon Guardians grouped with him, who are Bog dragons with roughly 100k health each. Fafnir cannot be frozen, however the Guardians can, so first round the wizzie tries to freeze one, the secondary caster and 2 of the giants try to freeze the other, one giant EBs, and the AEGW in the hot seat prepares to get smacked around a whole lot. If both freezes take, you're in great shape. The wizzie should refreeze the Guardian the secondary caster and the giants froze first round, while the secondary caster EBs, the AEGW changes weapons and hat, and the other 3 giants start in on Fafnir. (If Fafnir casts first and second round instead of attacking, the giants should guard. Don't go to him.) The refreeze may or may not take second round, if it doesn't, the wizzie should keep trying while the backup caster keeps EBing. Yes, EB every round. The Guardians may be frozen, but they can still do 15-20k damage if they both Acid Rain at the same time.
If one of the Guardians doesn't freeze, all is not lost. The AEGW needs to push that Guard back and away from the group while everyone else works on Fafnir. If neither Guardian freezes, you're toast. If the entire group dies, Fafnir will always go for the item on the floor with the highest shop food value first, and he seldom ever redrops what he picks up. So, here's a tip to save your HoK: Each toon in the group should be carrying a bottle of 100k hair dye. (Those are the regular colors.) First toon to bite the dust should drop their bottle of dye, then whichever toon that doesn't die last, and has the fastest connection, should bring up the Alt-T treasure window and get ready to click. As each toon dies you will see what they've dropped in that window, but you won't be able to pick it up until everyone is out of the cloud. Once the last toon falls out, right-click (do not left-click and click take, that's too slow, so is "take all") on the items you want to save, starting with the helms, if any. Ignore any 1k stacks, they aren't worth it. Fafnir will go for the dye first, buying you some time, but he's still quick, so you have to be quicker. More than one person can and should be grabbing for what drops, don't worry if it's yours or not, just grab what you can and give it to the proper owner once everything is picked up.
Remember to keep yourself invulled, and your AEGW too, because they won't be able to reliably do it themselves as long as they're wearing the Marvin hat
Good luck!

No comments:
Post a Comment